Rare Rocks And Gems.Com

NORTHWEST ROCKS & GEMS - PREMIUM LAPIDARY ROUGH-UNIQUE COLLECTIONS

Morrisonite Dragon Brooch/Necklace Project

Silverwork by Steve Ferenz

Below is Steve’s documented process of the Morrisonite Dragon Project I commissioned him to do for me. I had Steve create it based on my idea’s on how best the cab could look without overwhelming it with a bunch of silverwork. I also wanted him to document the process for prosperity. One of the main factors in my design decision is that I needed to cover up a fracture that ran half way across the cab. Re-cutting it was not an option, because it would take away the whole beauty of the stone. I acquired the Morrisonite cab from the Collection of the late Wally Hendrickson. Wally was a great friend of Jake Jacobitz and more than likely got the rough slab from Jake. This cab must be pretty old, because Wally tried to use Hide Glue to seal the crack…without too much success. The idea was to have a dragon tail sweep across the front of the cab covering the fracture just enough so that the look of the stone is not compromised. Steve did great work and held true my ideas and design concept. Thanks Steve!
The completed dragon piece is in hand

Philip of RareRocksAndGems – contacted me and asked if I would be interested in doing a project for him that he had been thinking about for a while. It is a dragon mounted on a piece of really cool Morrisonite. Always looking for a challenge, I asked to see what he had in mind.

Here’s the 1st photo Philip e-mailed me to look at >>

Asking him for more detail on what he wanted I received this photo with instructions that he wanted the dragon’s tail modified to cover the crack in the stone >>
Interesting……….so I asked for a larger photo of the dragon he wanted so I could study it to see if it was possible >>

Studying the photos I figured that it was possible and I would accept this project so Philip sent me the stone for 1st hand scaling and re-designing >>

This being a monochromatic photo it was hard to determine the different layers that would be needed to complete the overlay process to construct the dragon. So I traced the outline of the dragon making a simple line drawing >>

Next, I scanned the outline and downloaded it to a photo program I use for design work. Now came the tedious work of whiting out all the shaded area to bring out the line drawing. Pixels at a time quite tedious………
The tail had to be re-positioned so I changed that to cover the crack. The claws were not very pleasingly designed, so I re-designed those also and added them to an improved line drawing >>
Using the add color aspect of the photo program I added different colors for the different layers that were to be needed >>
Scaling it down to the size required for the finished project I sent Philip an e-mail for final approval to the design concept >>
He approved and so continued on with the design concept >> The first thing to do was to break down the different layers to be constructed by tracing them from a larger scaled line drawing. There are a total of 11 major pieces and a few other minor ones >>

Next, the photos had to be scaled to the correct size and determine the gauge of sheet silver to use for which part. After scaling to the correct size I transferred the two drawings to a ¼” graph paper for the final pattern >>

As you can see, the dragon is a little on the small size (approximately 2 ¼” x 1 ½”) with a lot of small pieces to cut, overlay solder and fabricate the finished piece. What a challenge……

Now comes the harder part – cutting and soldering the sub-assemblies.

Since there many tiny parts sub-assemblies are necessary in order to maintain some semblance of sanity during this project. I will be assembling the entire thing from the top down. This is because no matter how good one is at drawing patterns and cutting them out it is virtually impossible to cut exactly >>

The first thing I’m going to work on is the top wing sub-assembly. Here, I cut out the part of the pattern I’m using, cut a piece of sheet silver appropriately sized, clean the silver on a medium sating wheel and then using Elmer’s Glue stick it to the silver for cutting. I used a 4/0 (0000) saw blade for all the cutting >>.

The two pieces I’m doing first are the top wing shoulder, elbow and 1st finger and then the wing webbing that is under it >>

The elbow part is all cut out as the pattern indicates the shape. Next I cut out the webbing in the areas that are not part of the top shoulder. I’ve marked the end of the pattern area to be cut and will leave that until the top is soldered on. At his point I will do some sculpting on the shoulder piece using my Foredom with small Craytex wheels >>
Once soldered together, the remaining excess is sawed off to complete this part of the sub-assembly >>
Now comes the under part of the top wing. The method is the same as the above parts – cutting out those areas that are not part of the assembly to be overlain on top – notice the slash marks on the pattern where the cutting stops >>
Position the shoulder piece, solder and trim >>
Now here comes a little tricky part: Using 22g round wire (smallest I have) I need to make three partial fingertips for the under wing webbing. I cut three pieced a little larger than needed, bend them appropriately, file the top tip so it butts up against the proper edges, solder in place (I pre-soldered each of the fingers) and trim and file to fit. I oxidized the piece to illustrate the three layers and six pieces involved >>
The next sub-assembly to tackle is the head area. The back scales are cut out as designed. The second below it is only partially defined so to allow space to solder the scales properly. And the third layer only has the forehand detailed. And since I was cutting small I did the rear leg also >>
Here is the total sub-assembly completed and sculpted >>
For a size comparison, so all can relate, I’ve added a Quarter next to all the sub-assemblies >>
Alright, now that the two sub-assemblies are completed its time to start adding parts to the body. The first step is to set the sub-assemblies on the initial body area and do some minor body defining >>
Once cut out then the sub-assemblies are soldered on and re-sawed to follow the body and wing lines >>
The next body layer deals with the shoulder elbow and knuckle of the back wing >>

The last layer to attach is the back wing webbing, which also has my Maker’s mark and other stamping on it, and also a finger tip on the back wing . After sculpting what I could this completes the dragon assembly process.

Next we will be dealing on how to attach the dragon to the Morrisonite cab, set the bale for a necklace and add a broach pin assembly.

Since the Morrisonite is a cab, the dragon will have to be bent into place around the head and tail/wing tip areas to fit the contour of the cab. I can’t really scan that in so you’ll have to imagine it >>

I decided to use 14g square wire for the 4-prong basket to hold the cab. One top prong are positioned to cover the crack in the cab and attach to the tail and the other is to attach to the neck area.

Now the top two spires need to be ground down flat on the top and close to the stone as not to lift the dragon too high off the stone >>

Once I completed this, the basket needed to be soldered to the back of the dragon. Here’s a really tricky part – one has to determine where the spires attach without actually seeing it…I held the dragon on top with the stone in place and guessed where to make the 1st solder joint.

I guessed right! Soldered the 2nd mount to the dragon and then the bale for a chain. For the broach pin findings I had to solder a little tab to the back frame so the point of the pin didn’t stick out >>

Final step is to solder the pin findings in place. When it comes to the clasping part of the finding, I always position the opening on the clasp down. This way, if the little rotating lock ever opens the pin should stay in place……hopefully

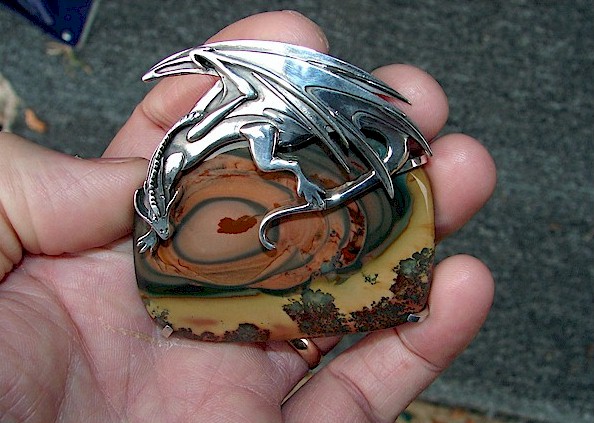
Now it’s off to a friend’s shop to have the piece tumble polished to remove the fire scale before the final oxidation, polishing and assembly.

Here is the completed piece with two different backgrounds. Six layers of sterling and 14 individual pieces make up the dragon with a total piece count of 21 for the completed pendant/broach.

I just Love it

The completed dragon piece is in hand

Video